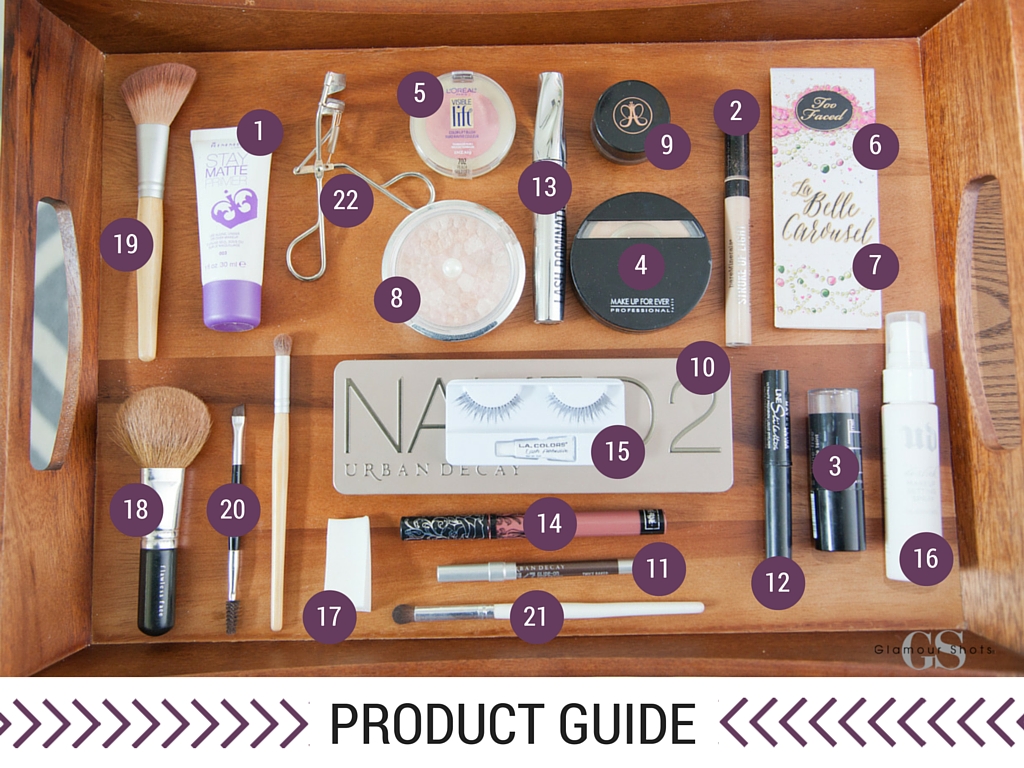
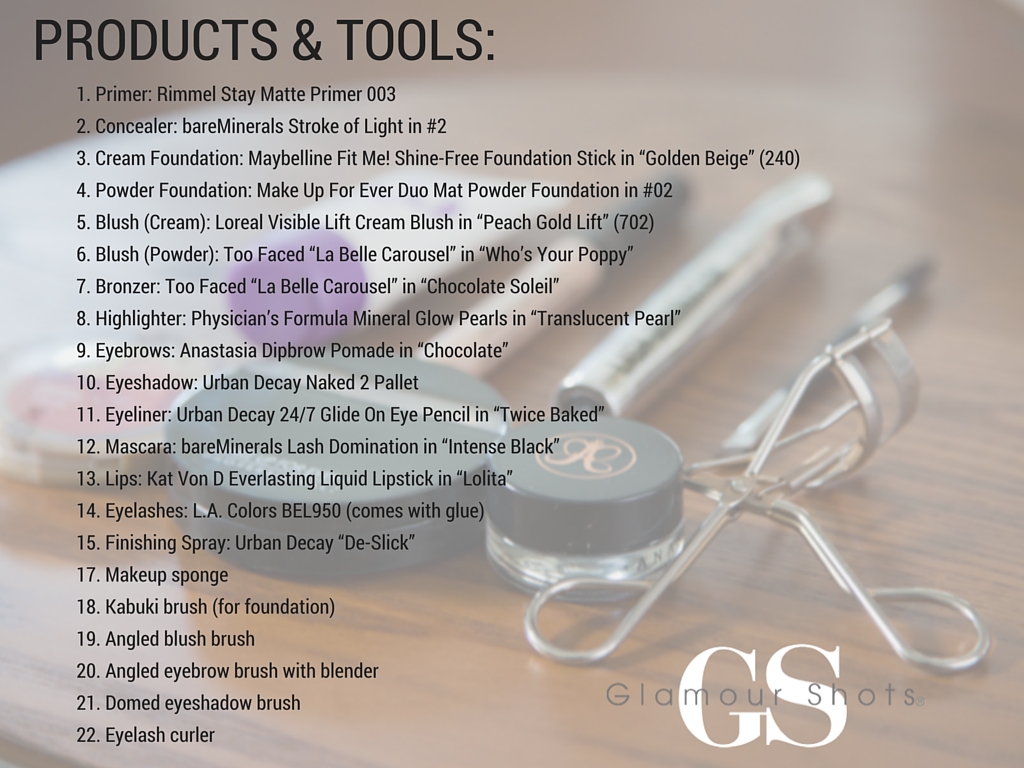
Most women don’t wear the same amount of makeup for every activity. On a day like a Saturday, there are multiple events or situations that you could be involved in, from errands to brunch or a night on the town. Each of these occasions calls for a different amount and type of makeup style. I’ve put together three looks that you can transition from morning until night without completely removing your makeup.
Products and Tools
My skin is classified as “combination;” oily in my t-zone and dry in some areas, so the products I use are best for that skin type. The makeup used in this video is a combination of drug store and professional brands, so it can work with most everyone’s budget. I have tried and tested tons of different professional grade and drug store products, and these are the ones I have found work with my skin best. Don’t focus so much on the products, but rather the looks that go with them!
Each look builds upon another, so not all of these products are used for each look. However, all of these products are used at least once in this 24-hour period.


Prep Your Face
I wash my face and moisturize every night before bed, but I always seem to wake up with a bit of an oily sheen. So, before putting on any makeup in the morning, I always rinse my face with water and dry with a soft towel. This removes any excess oil buildup without stripping my face of moisture. I finish by washing my hands before applying any makeup to prevent breakouts.
Look 1 – Morning Errands
Approximate Time: 3-5 minutes
The goal of this look is to make you look fresh and awake, without taking too much time or effort.
First, I apply a dime size amount of primer to my entire face, including my eyelids. This will keep any oil under control and keep products from moving around. Next, I use a concealer to lighten under eye circles and conceal any blemishes I may have and blend with my finger. Finally, I apply a powder foundation or finishing powder to create a soft, fresh look. I use a makeup sponge to press powder firmly on my t-zone areas. This helps absorb any oil that may produce later in the day.
Next, I use a cream blush to give myself some color. You can use a powder as well, but I find that a cream blush sticks better when you aren’t using a full coverage foundation.
Because this look is a bit lighter than an average look, filling in your eyebrows is extremely important for definition. I use a tinted brow pomade made by Anastasia and apply it with her angled brow brush. I like this product because it tames the hairs and the color blends extremely well. First I outline the desired shape, then blend with the other side of the brush or a Q-Tip.
Make sure you blend eyebrows well, otherwise your brows won’t look natural. Never go outside of your natural eyebrow line, and don’t apply too much color. You should still be able to see your eyebrow hairs!
Finally, I curl my lashes and apply a few coats of my favorite mascara to complete the look. After everything has been applied, I use a Q-Tip to clean any excess product.
Look 2 – Brunch with Friends
Approximate Time: 5-7 minutes
The goal of this look is to give color and definition, while still looking very natural. This is also a great everyday look for work.
After I’ve run my morning errands, my makeup has started to fade. Especially since the first look is very basic, reapplying some elements is usually necessary. For “Look 2” I reapply my concealer with a sponge, as to not mess up my existing eye makeup or foundation. I also apply another thin layer of powder with a brush to set the concealer.
Next, I add a layer of powder blush with an angled blush brush. The cream blush used in “Look 1” is a great blush primer, so adding the powder on top really makes the color pop. I also add a bit of bronzer just beneath my cheekbones as well as on my hairline, jaw, and a dab on both sides of my nose. This adds some slight contouring and definition. Last, I add a pearlized highlighter powder to the tops of my cheekbones and the bridge of my nose. This has a slight shimmer, so it makes my face look less matte and brightens up any dullness.
Using a domed eyeshadow brush, I apply “Suspect” from the Naked 2 Eyeshadow Pallet to my eyelids, stopping at the crease. Next, using the same brush, I apply “Chopper” from that same set, just along the crease of my lids (where your eyelid begins to fold).
Adding eyeliner can also make your eyes look bigger if done correctly. In this look, I use a brown, slightly shimmery eyeliner pencil on the outer corners of my top and bottom lid. I take my finger and blend inward toward my tear duct, leaving the darkest side on the outer corner. Finally, I apply another coat of mascara to cover any shadow that fell during application.
Last, I apply a natural lip color. I chose a “chestnut rose” colored lipstick called “Lolita” by Kat Von D. What’s great about this product is that it stays on, even while you eat brunch! This is a great all-day lipstick that can be worn for any occasion.
Look 3 – Night Out
Approximate Time: 10-15 minutes
The goal of this look is to define eyes, cheekbones and lips. This look is a little more dramatic, so it also works great for photos. The extra definition used accentuates features, even under bright flashes.
Because I want my makeup to be longer lasting during my night activities, I actually reapply my entire foundation for this look. However, I am able to leave my eyebrow and eye makeup intact by using a makeup wipe to remove everything else. Once my face is clean, I apply shine-free stick foundation and blend with a soft makeup sponge. Then, I reapply concealer and powder to make sure the look set.
Next, I reapply blush, bronzer, and highlighter just like in “Look 2” but with a heavier hand. When you’re going to be out at night, it is acceptable to add a little more color. Especially if any flash pictures might be taken, you’ll be happy you added an extra swipe of blush.
Once all of your powder elements are complete, use a makeup wipe or Q-tip to wipe the excess from your lips. Though some believe that applying foundation to the lips before lipstick can help it stay longer, the liquid lipstick used in this look works best on clean lips. I also use the blending side of my eyebrow brush to dust any powder from my brows, and add a bit of eyebrow color to my mole just above my lip to make it pop under the foundation.
Next, I add a bit more eyeshadow contouring. I reapply the “Suspect” and “Chopper” from Look 2 on the lids and creases and add “Half Baked,” a gold shimmery powder, to the tear ducts and outer corners of eyes. Finally, I use a dark brown color called “Busted” to the outer corners of my eyes, blending into the crease, and continuing under the eye on the lower lid. This look is somewhat reflective of the popular “Halo” look where shadow creates a halo around the eyes, making them appear larger. After applying the darker shadow, I sometimes use a skin-toned shadow just under the eyebrow line to help blend. I also use a makeup sponge to make any eyeshadow lines softer or to blend the colors.
After applying shadow, I use a black liquid eyeliner to create a “wing.” Starting from the inner corner of my eye, I draw as close to my lash line as possible and swoop outward in the direction of my eyebrow. I try not to go too far outward or upward, but just long enough to be seen outside the corner of my eye. Liquid eyeliner can seem intimidating, but is actually easier than an eyeliner pencil after a while! After the liquid top liner, I use the brown eyeliner pencil from earlier on my lower lash line. I don’t ever line my entire bottom lid, just to right under my pupil. Leaving space on the bottom lid can make eyes appear bigger by opening them up.
Next, apply false eyelashes. You may have to trim the lashes to fit your eyelid. I always need to trim off at least 3 sections so that they aren’t poking me throughout the night. After trimming, I bend the lashes so they fit the contour of my eye.
Once the glue is ready, I apply the lashes starting from the outside corner. I try to get as close to my lash line as possible and use tweezers to align them if needed. I wait another 15 seconds, then use my fingers to curl them upward. The lashes will take another 2 minutes to dry completely.
Once the glue is no longer white, I apply another layer of liquid liner over the glue. Though the glue dries “clear,” adding another layer of liquid liner can help them blend better with natural lashes. Next, I add a layer of mascara to the bottom and top lashes, focusing on the outer corners.
Finally, I apply a layer of the liquid lipstick. For long-lasting lipsticks, don’t apply more than one layer. Too many layers will cause the formula will clump, causing it to flake and not last as long.
To seal the look, I use a mattifying finishing spray. I generally just spray once up and down and once side to side. Allow finishing sprays to dry completely before opening your eyes, otherwise you may create creases in your shadow or cause your mascara to transfer to your lids.
I hope these looks and tips were helpful! Keep in mind that everyone’s skin is different, so make sure you test every product on a small area of skin before trying it on your entire face. Also know most every store will allow you to return makeup within 30 days (even if you use it!) so don’t be afraid to try something new! For more beauty and fashion tips, check out these other Glamour Shots blogs.


